


As software developers, it is critical to lower the chances of our program failing by running tests with the end-user in mind and testing your application the same way they would use it.
It's impractical to expect an application's components to work reliably around the clock. When a modification or tweak to an existing piece of code happens, things may or may not break, and it's best to assume the worst. Furthermore, if we have automated tests developed for various components in our app, we can immediately notice when a change breaks something in our app—before we release our code to production.
Testing is the process of evaluating a system or its component(s) with the intent to find whether it satisfies the specified requirements or not. In simple words, testing is executing a system to identify any gaps, errors, or missing requirements contrary to the actual requirements.
Quick Summary
This article explains what automated testing is, why writing tests for apps is important, the different forms of automated testing, Test Driven Development (TDD), the React Testing Library (RTL), and we will build a mini-project with a TDD approach.
This article is suitable for those who have never written a single line of test code before; Although to get the most out of this piece, you should be familiar with how to set up and navigate a new React project, as well as how to interact with a package manager. It is also necessary to be familiar with Axios.
Automated Tests
Automated tests are code snippets that execute your code and then verify if the output of that code execution satisfies a given expectation. If you write automated tests for your app, you can detect problems quickly when you start working on your code, and one or more tests fail.
Manual testing, on the other hand, is what we do when we click around our app in the browser, evaluating different features.
Why Should You Write Tests?
Helps detect bugs early and enables you to refactor your code.
Ensures your app satisfies its project specifications.
Reduces the time of manual testing (when a real user uses our app to test its functionality).
Shipping quality and efficient code to production.
Improve maintainability of code.
Testing is often thought to be a time-consuming process; writing tests === more code. On the other hand, every developer should be familiar with the basics of testing. Besides, who understands your code better than you?
Writing automated tests is half of the developer's effort in solving the problem. Knowing how to test your code is a great method to advance as a developer because it allows you to discover new things about your code and enhance your debugging skills 🚀.
Types Of Automated Testing
1.) Unit test
Unit tests are the simplest form of automated tests, where individual functions, methods, components, or units of an application are tested in isolation to ensure that they function properly.
For example, in a todo application, you can write a unit test for the input component to confirm that the user can type into it and change its value.
2.) Integration test
Integration testing is a type of software testing in which multiple units that work together are tested as a whole. This form of testing is used to ensure that the two or more units/modules can effectively communicate with one another.
For example, in a todo application, where there are three major components: an input element where a new todo is typed, an add button that, when clicked, adds the new todo to the list of todos, and a div element that renders the list of todos. Because these three components are logically grouped, an integration test can be written to ensure that they work well together.
3.) End-to-end test (E2E)
End to End Testing is a software testing technique that requires us to test the entire application from start to finish in a production-like environment. It is run in a simulated environment that emulates the behavior of a user. Tools like Cypress, Selenium, and Puppeteer can be used for E2E testing.
4.) Acceptance test
Acceptance testing is performed by the client/business owner to ensure that the application meets all requirements.
5.) Smoke test
Smoke testing is used to confirm that the fundamental functionalities of the system under test are functioning properly and at a high level.
Other non-functional software tests include security, performance, usability, and compatibility tests. More information may be found here.
Test-Driven Development (TDD)
TDD is a strategy for describing your code's behavior before it is implemented. It has the slogan 'Red-Green-Refactor'.
Red - An automated test case for a specific feature that (at first) fails is written.
Green - Write the code necessary to pass the test.
Refactor - Refactor or optimize your code.
Aside from pure TDD, there are other options to explore, particularly in frontend development.
React Testing Library (RTL)
The React Testing Library(RTL) is a lightweight testing solution for React components. This library is based on the DOM Testing Library and is a subset of the @testing-library package family. Its primary guiding principle is:
The more your tests resemble the way your software is used, the more confidence they can give you.
This implies that RTL allows us to test the behavior of our React components from the perspective of our app's users, rather than the implementation details of the component. Using RTL promotes your apps to be more accessible and helps you to get your tests closer to how a user would use your components, giving you more confidence that your application will function when a real user uses it.
Popular testing frameworks within the React community are Enzyme and Jest.
RTL is a library, and it is not specific to a testing framework, albeit Jest is the recommended choice, according to the official RTL documentation. As a result, we'll be combining it with Jest in this article.
Understanding a Test Block
Don't worry about configuration because every new React project bootstrapped with create-react-app has RTL and Jest already configured. If you are using custom React configuration, use the following command to install it.
npm install --save-dev @testing-library/react
Start a new React app with the code block below.
npx create-react-app my-app
After a React project is bootstrapped with create-react-app, a sample test for the App.js file is pre-configured in an App.test.js file.
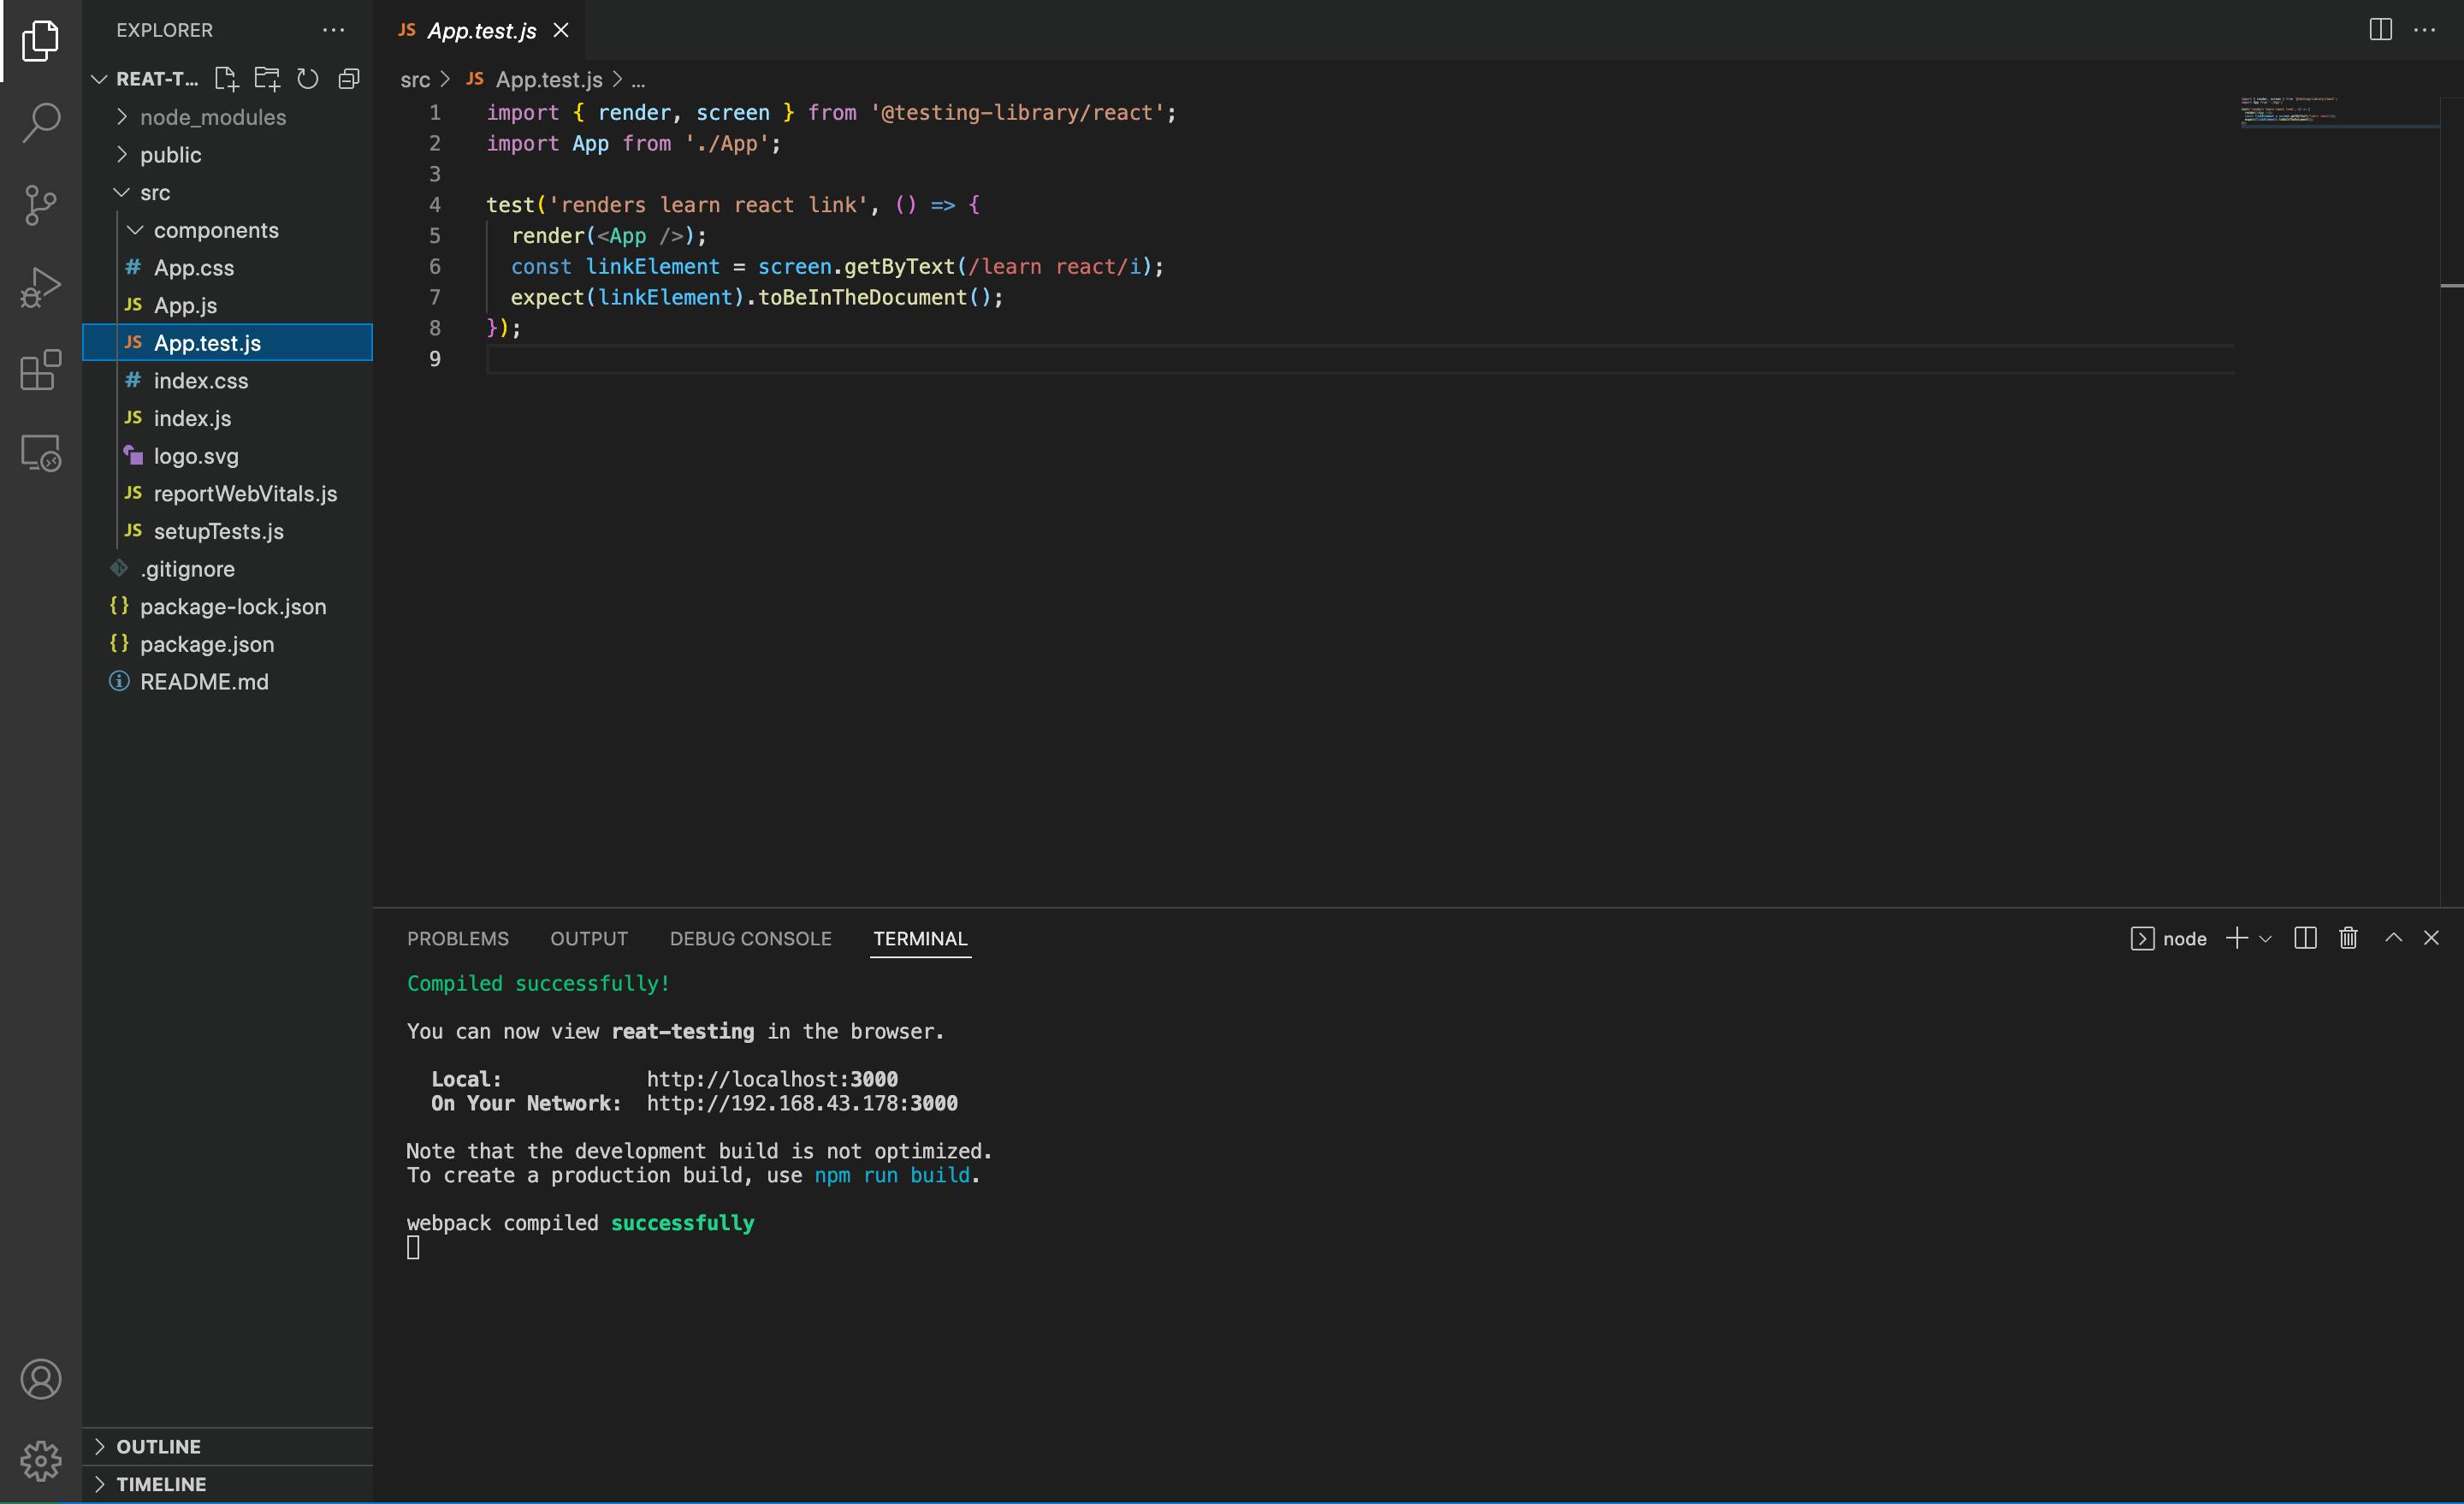
Let's break down the structure of this test.
// React testing methods are imported
import { render, screen } from '@testing-library/react';

import App from './App'; // Component to be tested

// Test block for the component
test('renders learn react link', () => {
  render(<App />);
  const linkElement = screen.getByText(/learn react/i);
  expect(linkElement).toBeInTheDocument();
});
// Tests are written in the test/it method provided by Jest
// A test method takes in two parameters:
// A description of the test and a function with logic to test

test("", () => {});
// OR
it("", () => {});
It doesn’t matter if you use the test or it method; nevertheless, I prefer the test method.
test('renders learn react link', () => {
  render(<App />); // renders the component into the DOM
  const linkElement = screen.getByText(/learn react/i); // gets element that has the text 'learn react'
  expect(linkElement).toBeInTheDocument(); // asserts that the element found is rendered
});
Within the function:
The component to be tested is rendered into the DOM.
Next, the DOM is queried for the
linkelement with the text "Learn React" using thescreenobject imported from RTL, which has several queries, in our case thegetByTextquery is used to select thelinkelement.
Remember how
getElementByIdand other Javascript DOM selecting methods work ? *Yep!, RTL has queries that can be used to select elements from the component to be tested. Check out a list of all the queries *
- In the last line of code, using an assertion provided by Jest, we test if the
linkelement is rendered in the DOM. Checkout other assertion methods here.
expect(linkElement).toBeInTheDocument();
Finally, to run our test, run npm run test or yarn test and then press a. All tests in the project will be run in watch mode. Jest will execute files that end with .spec.js or .test.js automatically.
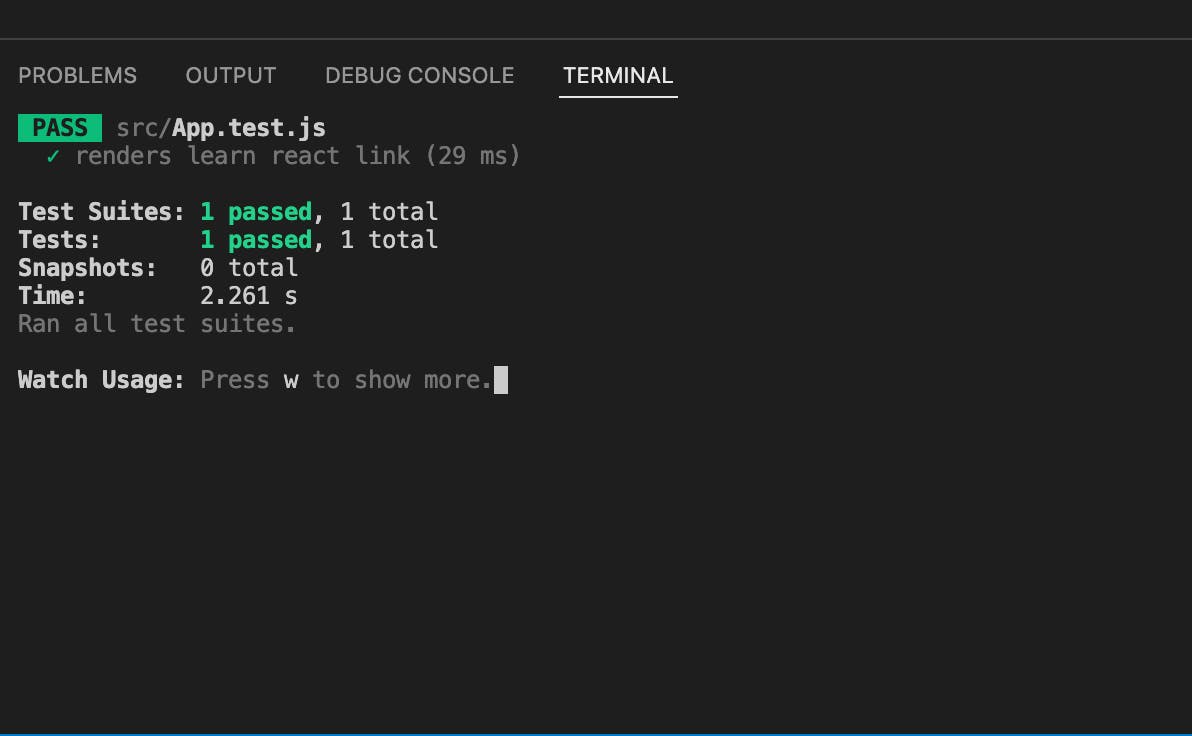
As you've noticed, our test passed. Let's make it fail. In the App.js file, change the text of the a element to 'Hello World'.
   <a
     className="App-link"
     href="https://reactjs.org"
     target="_blank"
     rel="noopener noreferrer"
     >
       Hello World
     </a>
You should see the test fail with this error message:
TestingLibraryElementError: Unable to find an element with the text: /learn react/i. This could be because the text is broken up by multiple elements. In this case, you can provide a function for your text matcher to make your matcher more flexible.
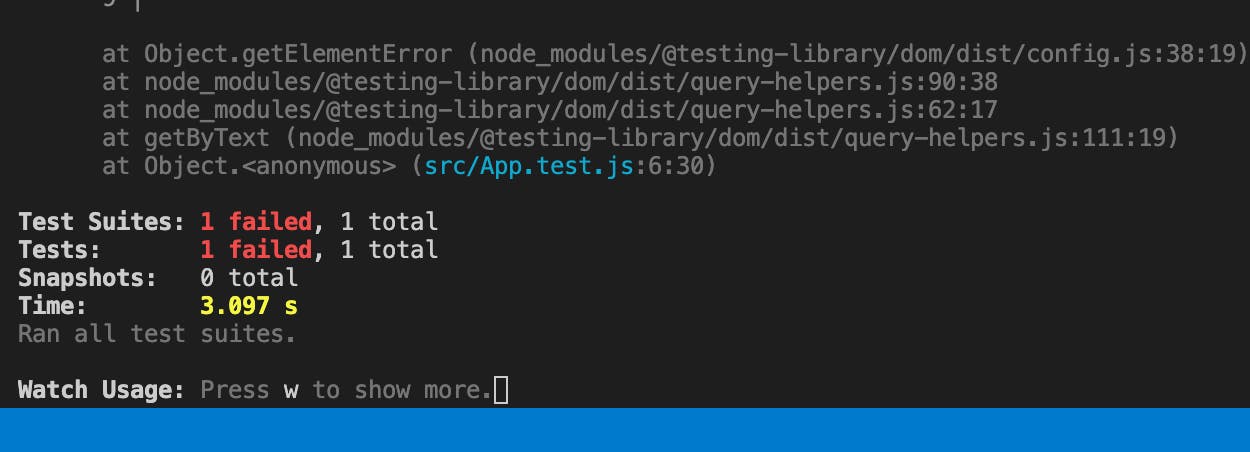
This is because, on the DOM, there's no element with the text 'learn react'. If you go ahead and add a new element with the text 'learn react', the test will pass again.
Guess what? you've implemented your first unit test!
As we progress, we'll build a mini Friend Request project, but first, I'd want to highlight the many methods RTL has provided for us to select elements from the DOM, as well as a few assertions methods from Jest.
Query Selectors
In the initial example, we utilized the getByText method from the RTL, which is one of the query methods available. After an element is selected, we may make various assertions or mimic user interactions to engage with it.
If you haven't guessed it now, the getByText method selects an element based on the text within the element, regardless of it being a div, h1, p, a or h4; as long as it finds an element that has the provided text, it selects that element.
It accepts a string
getByText("learn react")
or regular expression (The i flag makes the regular expression case-insensitive.)
getByText(/learn react/i)
For selecting DOM elements, the RTL includes a variety of query methods. Each of the query methods falls into one of the following groups:
Single elements:
getBy...,findBy...,queryBy...Multiple elements:
getAllBy...,findAllBy...,queryAllBy...
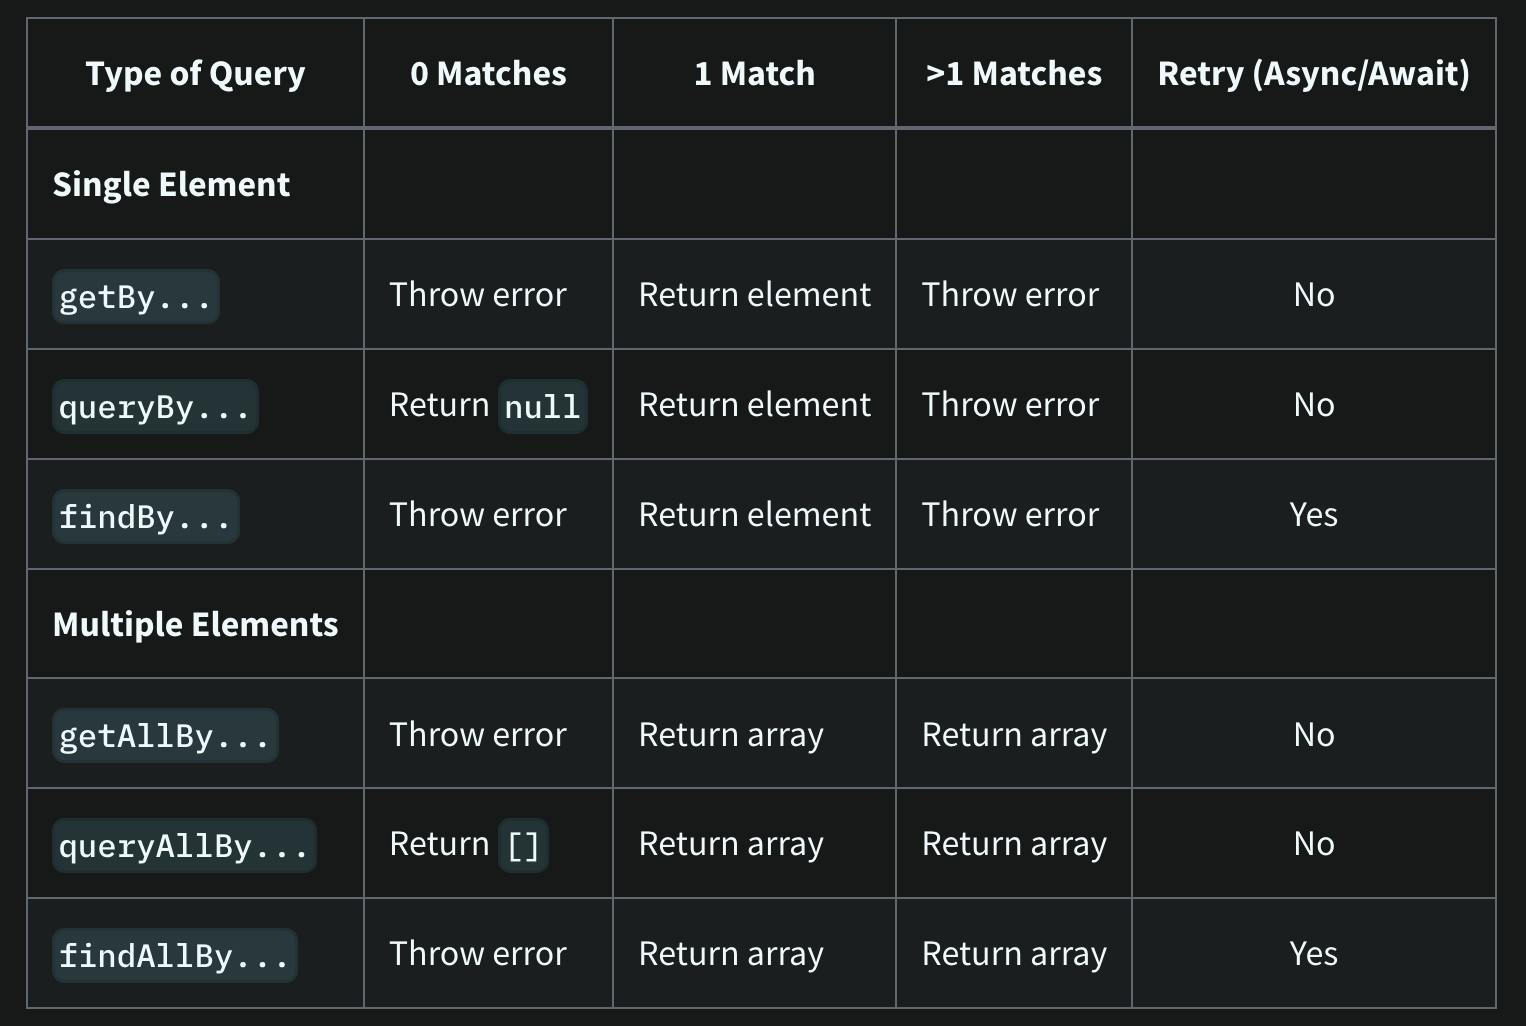
The table above is from RTL's official documentation and shows an overview of what the various categories return.
The suffixes for all the above mentioned are:
LabelTextPlaceholderTextTextDisplayValueAltTextTitleRoleTestId
We can use this to derive all of the methods in the getBy category :
getByLabelTextgetByPlaceholderTextgetByTextgetByDisplayValuegetByAltTextgetByTitlegetByRolegetByTestId
All of the other categories follow the same pattern. Check queries on the official docs to learn everything there is to know about the different methods.
Jest matchers
When developing tests, you usually need to confirm that the values fit specific requirements. expect includes a variety of "matchers" that enable you to validate different things. More custom matchers are included in a separate package called jest-dom by RTL.
Take a peek at the package.json file, you'll notice jest-dom is already installed as a dependency.
  "dependencies": {
    "@testing-library/jest-dom": "^5.16.4",
In our initial test, we utilized the matcher toBeInTheDocument to determine whether or not the linkElement was in the DOM.
expect(linkElement).toBeInTheDocument();
A few examples:
// toBe
test("Test that name is John", () => {
  const name = "John";
  expect(name).toBe("John");
});

// toEqual
test("Two plus Two equals Four", () => {
  const result = 2 + 2;
  expect(result).toEqual(4);
});

//toContain
test("Vowels", () => {
  const vowels = ["a", "e", "i", "o", "u"];
  expect(vowels).toContain("e");
  //  .not
  expect(vowels).not.toContain("z");
});
Learn more about Jest's matchers by clicking here. jest-dom custom matchers may be found here.
Mini Project
For this section, we'd build a simple friend request app, user data will be pulled from randomuser.me/api/?results=5
Let's outline our app's specifications:
While waiting for an API response, display a loading indicator that reads
Loading....Display friend requests on the screen once the API call returns with a status of 200.
Users should be able to decline friend requests.
If there are no more requests, a refresh
buttonon click calls the API to fetch new data.
The corresponding git branch for the initial setup can be found here
To clone a specific branch of a git repository, follow the syntax:
git clone --branch <branchname> <remote-repo-url>
So in our case, run the code block:
git clone --branch initial-setup https://github.com/Giftea/friend-request-RTL-jest-app.git
Following a TDD approach, we'd write the test before building out our component. Create a new file src/components/Requests/Requests.test.js.
// src/components/Requests/Requests.test.js
import axios from "axios";
import {
render,
screen,
waitForElementToBeRemoved,
fireEvent
} from "@testing-library/react";
import Requests from "./Requests";
describe("Requests page", () => {
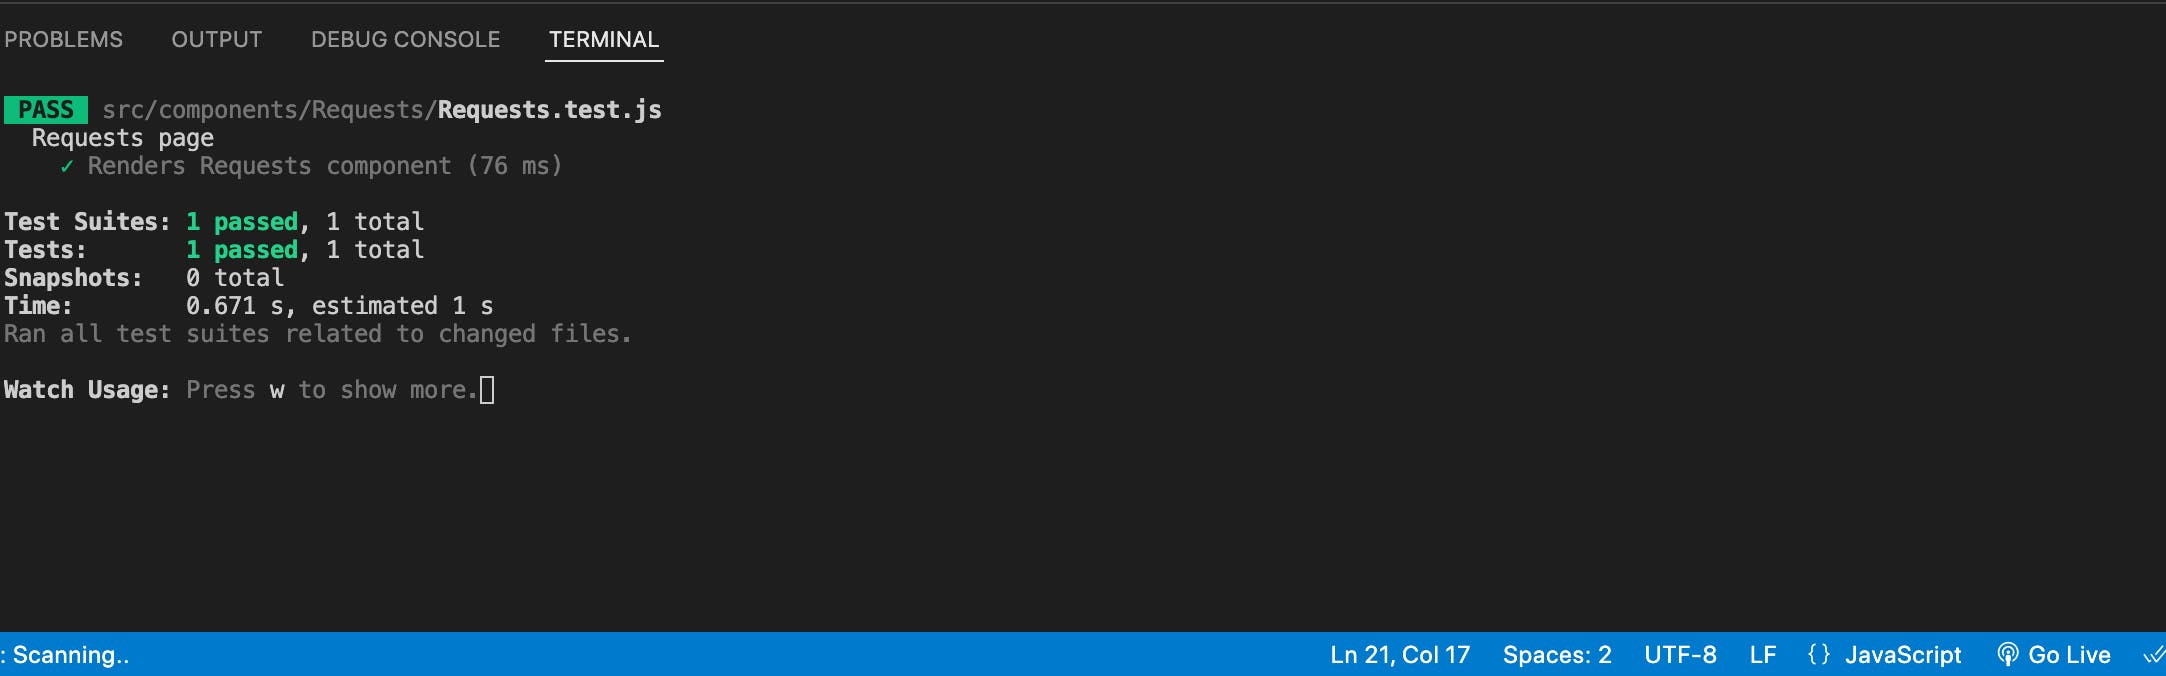
test("Renders Requests component", async () => {
render(<Requests />);
await Promise.all([
waitForElementToBeRemoved(() => screen.queryByText(/Loading.../i)),
]);
expect(axios.get).toHaveBeenCalledTimes(1);
});
});
Our test block is included within a describe function; this is used to scope tests.
First, the <Requests /> component is rendered; keep in mind that the goal is to develop tests that mimic how the software is used. Before the data is fetched, the user is aware that it is loading, because of the loading indicator that reads Loading... displayed on the screen. And after the API request returns with a status of 200, the loading indicator is no longer on the screen.
So we utilize the async method waitForElementToBeRemoved wrapped in a Promise.all method to wait for Loading... to disappear from the screen. Next, we verify that the axios.get call was only executed once.
Mocking with Jest
Jest allows us to mock/mimic the behavior of functions in our application; jest.fn() is used to create a mock function.
Instead of requesting data from our API in the test file, we will create a mock function that returns dummy data that is similar to the data returned from the API.
This is important because we are testing our react application, and if our test sends a request to the actual API, we are also testing the API; if the API fails, our test will fail. As a result, decreasing the confidence in our application.
Create a new file src/__mocks__/axios.js. Because we are simulating axios, the file name must be axios.js, and mock files are stored in the __mocks__ folder, which is placed in the src folder.
// src/__mocks__/axios.js
import { mockData } from "../mockData";

const customAxios = {
    get: jest.fn().mockResolvedValue(mockData),
  };

export default customAxios
We imported mockData and included it to be returned when we make the API call in our test. The structure of your mock data has to be similar to the structure of the data returned from your API.
// src/mockData.js

export const mockData = {
  data: {
    results: [
      {
        name: { first: "Alison", last: "Carlson" },
        email: "alison.carlson@example.com",
        login: {
          uuid: "56f8e0af-50bb-483b-ba30",
        },
        picture: {
          medium: "https://randomuser.me/api/portraits/med/women/25.jpg",
        },
      },
      {
        name: { first: "Frederik", last: "Larsen" },
        email: "frederik.larsen@example.com",
        login: {
          uuid: "162b6088-870a-4b12-bcbf",
        },
        picture: {
          medium: "https://randomuser.me/api/portraits/med/men/27.jpg",
        },
      },
    ],
  },
};

// Single Mock Data
export const singleMockData = {
  name: { first: "Alison", last: "Carlson" },
  email: "alison.carlson@example.com",
  login: {
    uuid: "56f8e0af-50bb-483b-ba30",
  },
  picture: {
    medium: "https://randomuser.me/api/portraits/med/women/25.jpg",
  },
};
Run the test with npm run test or yarn test.
When we run our test, Jest identifies the __mocks__ folder and utilizes the axios customizations we've set instead of axios from the node_modules folder. Axios calls return a promise that resolves to the data we want, so we follow suit and return a promise containing the data we want (dummy data in the src/mockData.js file).
Learn more about mock functions on the official docs.
At this point our test is failing because we've not built our components, so head on to src/components/Requests/Requests.js and paste the code block below:
// src/components/Requests/Requests.js

import React, { useState, useEffect } from "react";
import Request from "../Request/Request";
import axios from "axios";

const Requests = () => {
  const [loading, setLoading] = useState(true);
  const [friendRequests, setFriendRequests] = useState([]);

  useEffect(() => {
    fetchFriendRequests();
  }, []);

  const fetchFriendRequests = async () => {
    try {
      const { data } = await axios.get("https://randomuser.me/api/?results=5");
      setFriendRequests(data.results);
      setLoading(false);
    } catch (error) {
      console.log(error);
    }
  };

  if (loading) {
    return (
      <div className="loading">
        <h1>loading...</h1>
      </div>
    );
  }

  return (
    <section>
      <div className="title">
        <h2>friend requests</h2>
        <div className="underline"></div>
      </div>
      <div>
        {friendRequests.map((request, index) => {
          const { login } = request;
          return <Request index={index} key={login.uuid} {...request} />;
        })}
      </div>
    </section>
  );
};

export default Requests;
We created a fetchFriendRequests function that fetches the data from the API and called the function within a useEffect block. When the API returns, the state is updated and loading is set to false.
Because we haven't built the Request.js component, our test will still fail, so navigate to src/components/Request/Request.js and paste the code block below:
// src/components/Request/Request.js

import React from "react";

const Request = ({ name, email, login, picture, index, id }) => {
  return (
    <div className="single-request" >
      <div className="single-request-main">
        <div>
          <img src={picture.medium} alt={name.first} />
        </div>
        <div>
          <p>
            <strong>Name</strong>: {name.first + " " + name.last}{" "}
          </p>
          <p>
            <strong>Username</strong>: {login.username}{" "}
          </p>
          <p>
            <strong>Email</strong>: {email}{" "}
          </p>
        </div>
      </div>
    </div>
  );
};

export default Request;
Test passed!
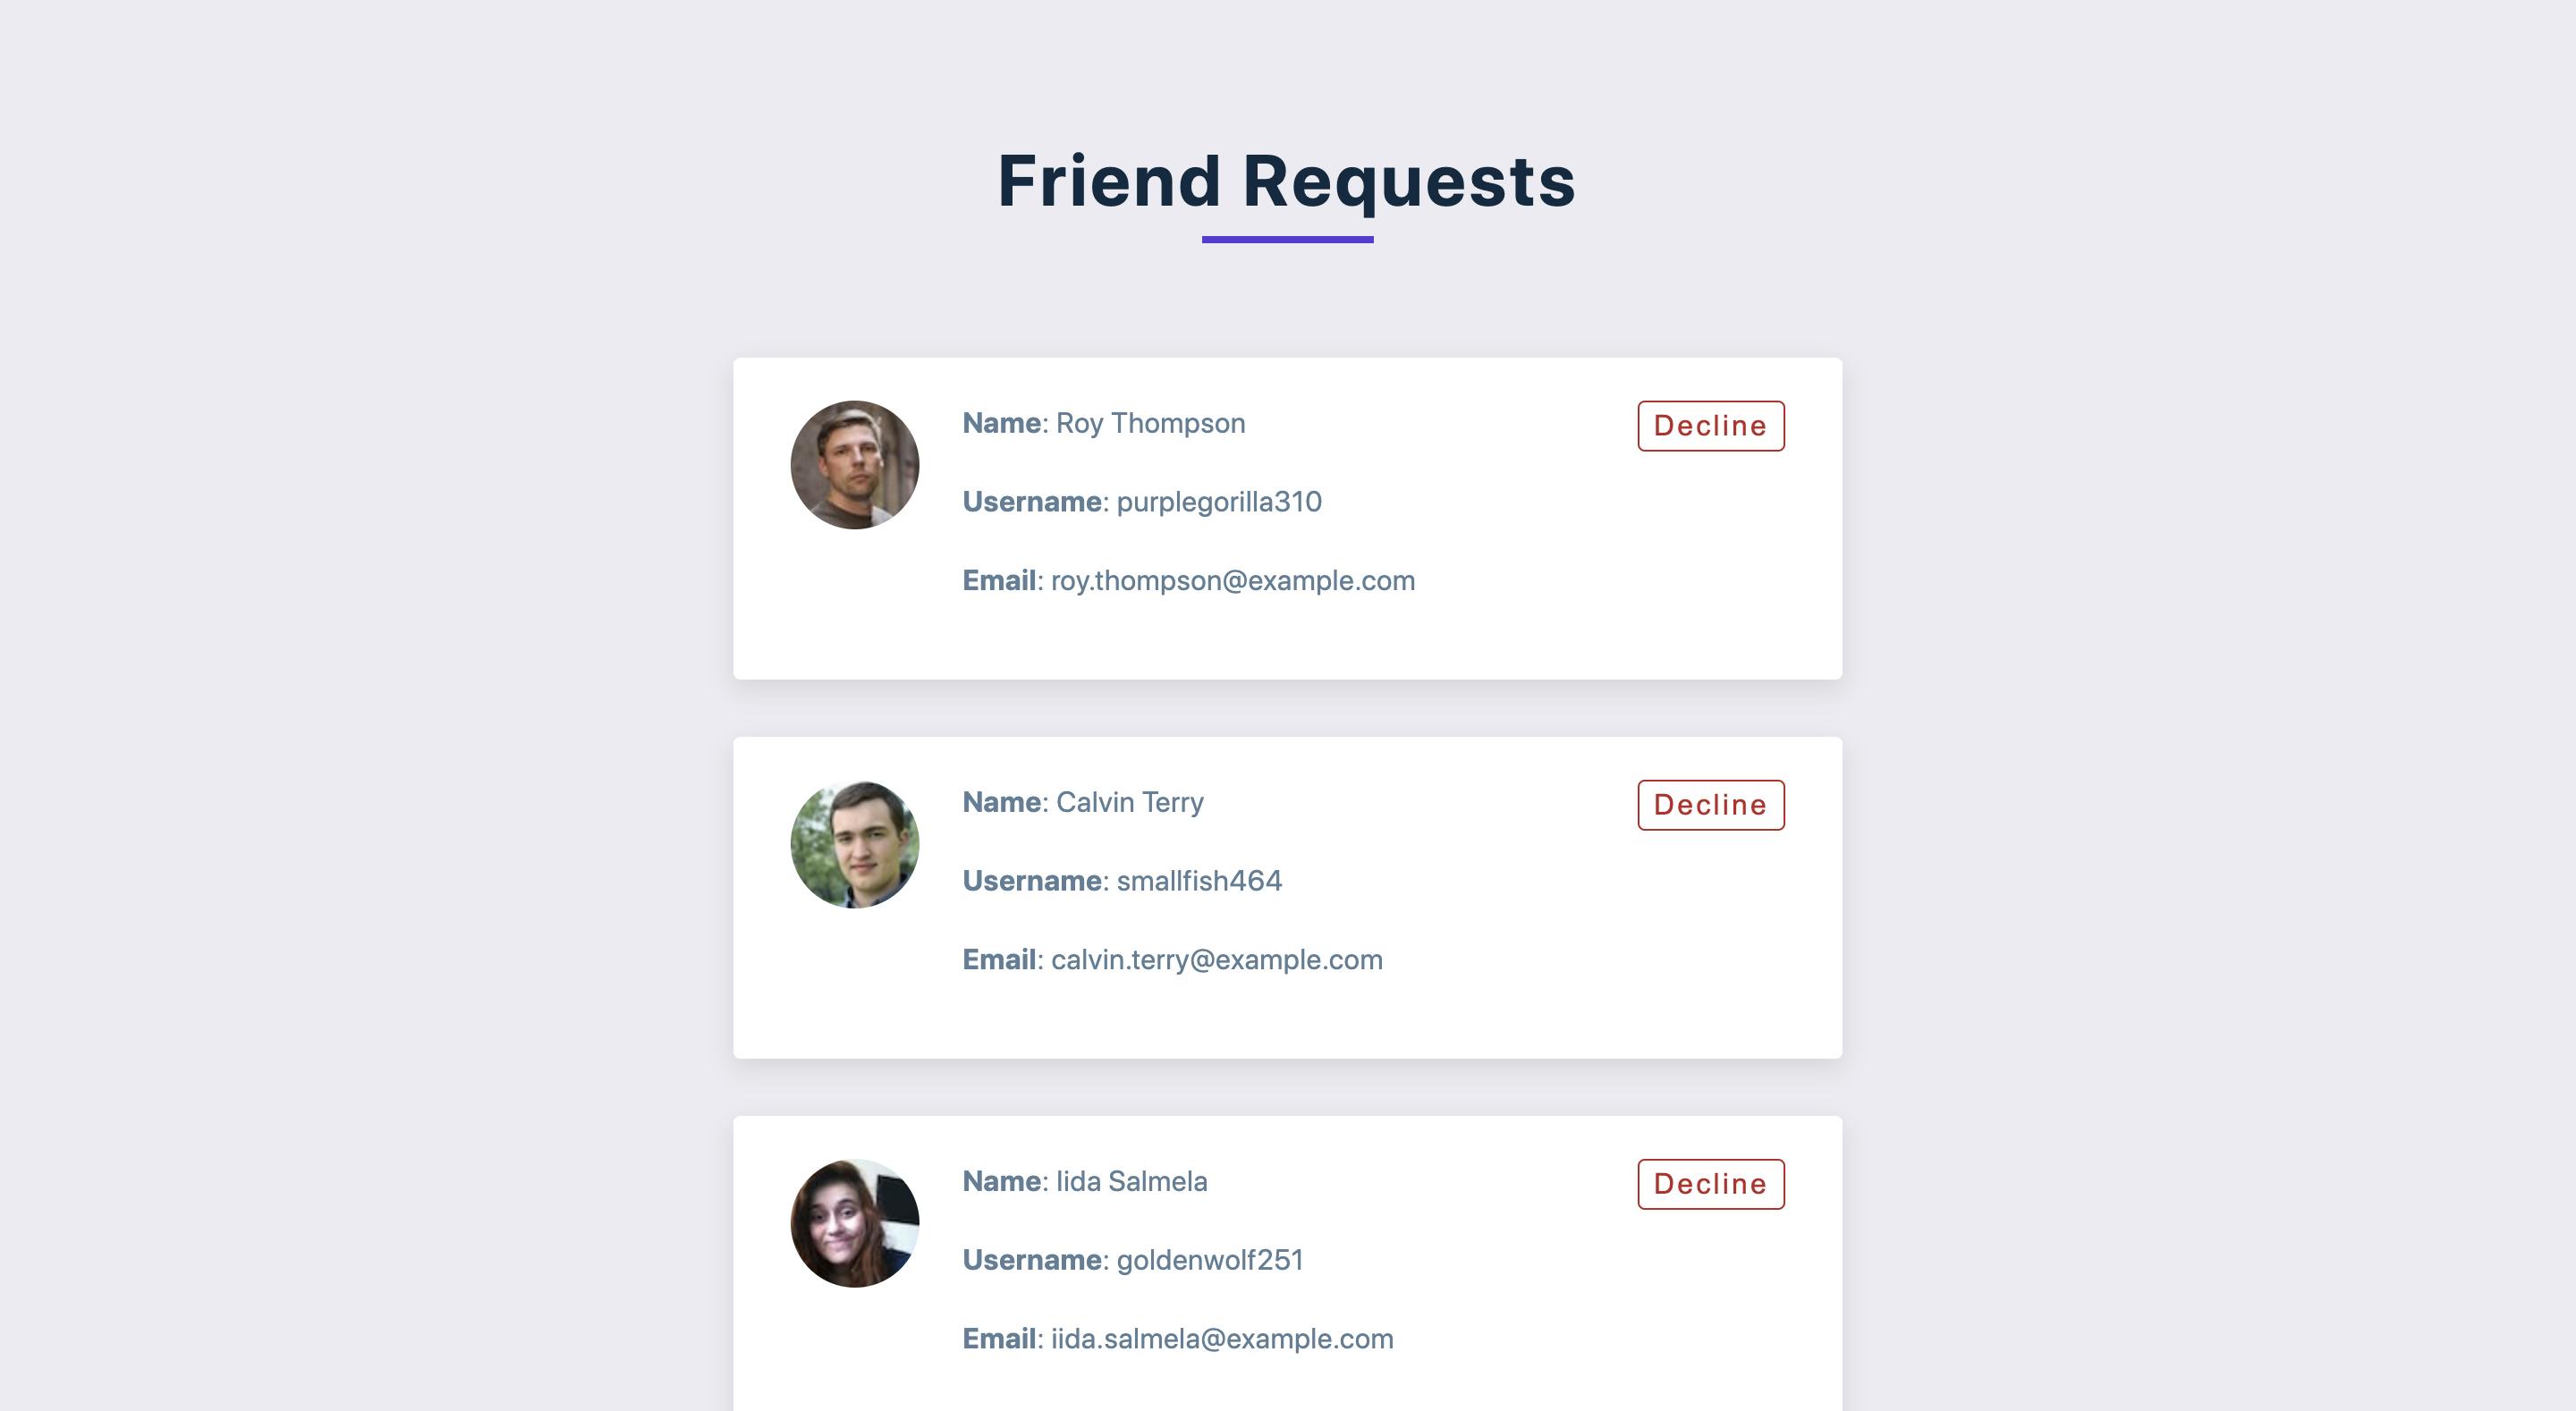
And our project is also looking good on localhost:3000
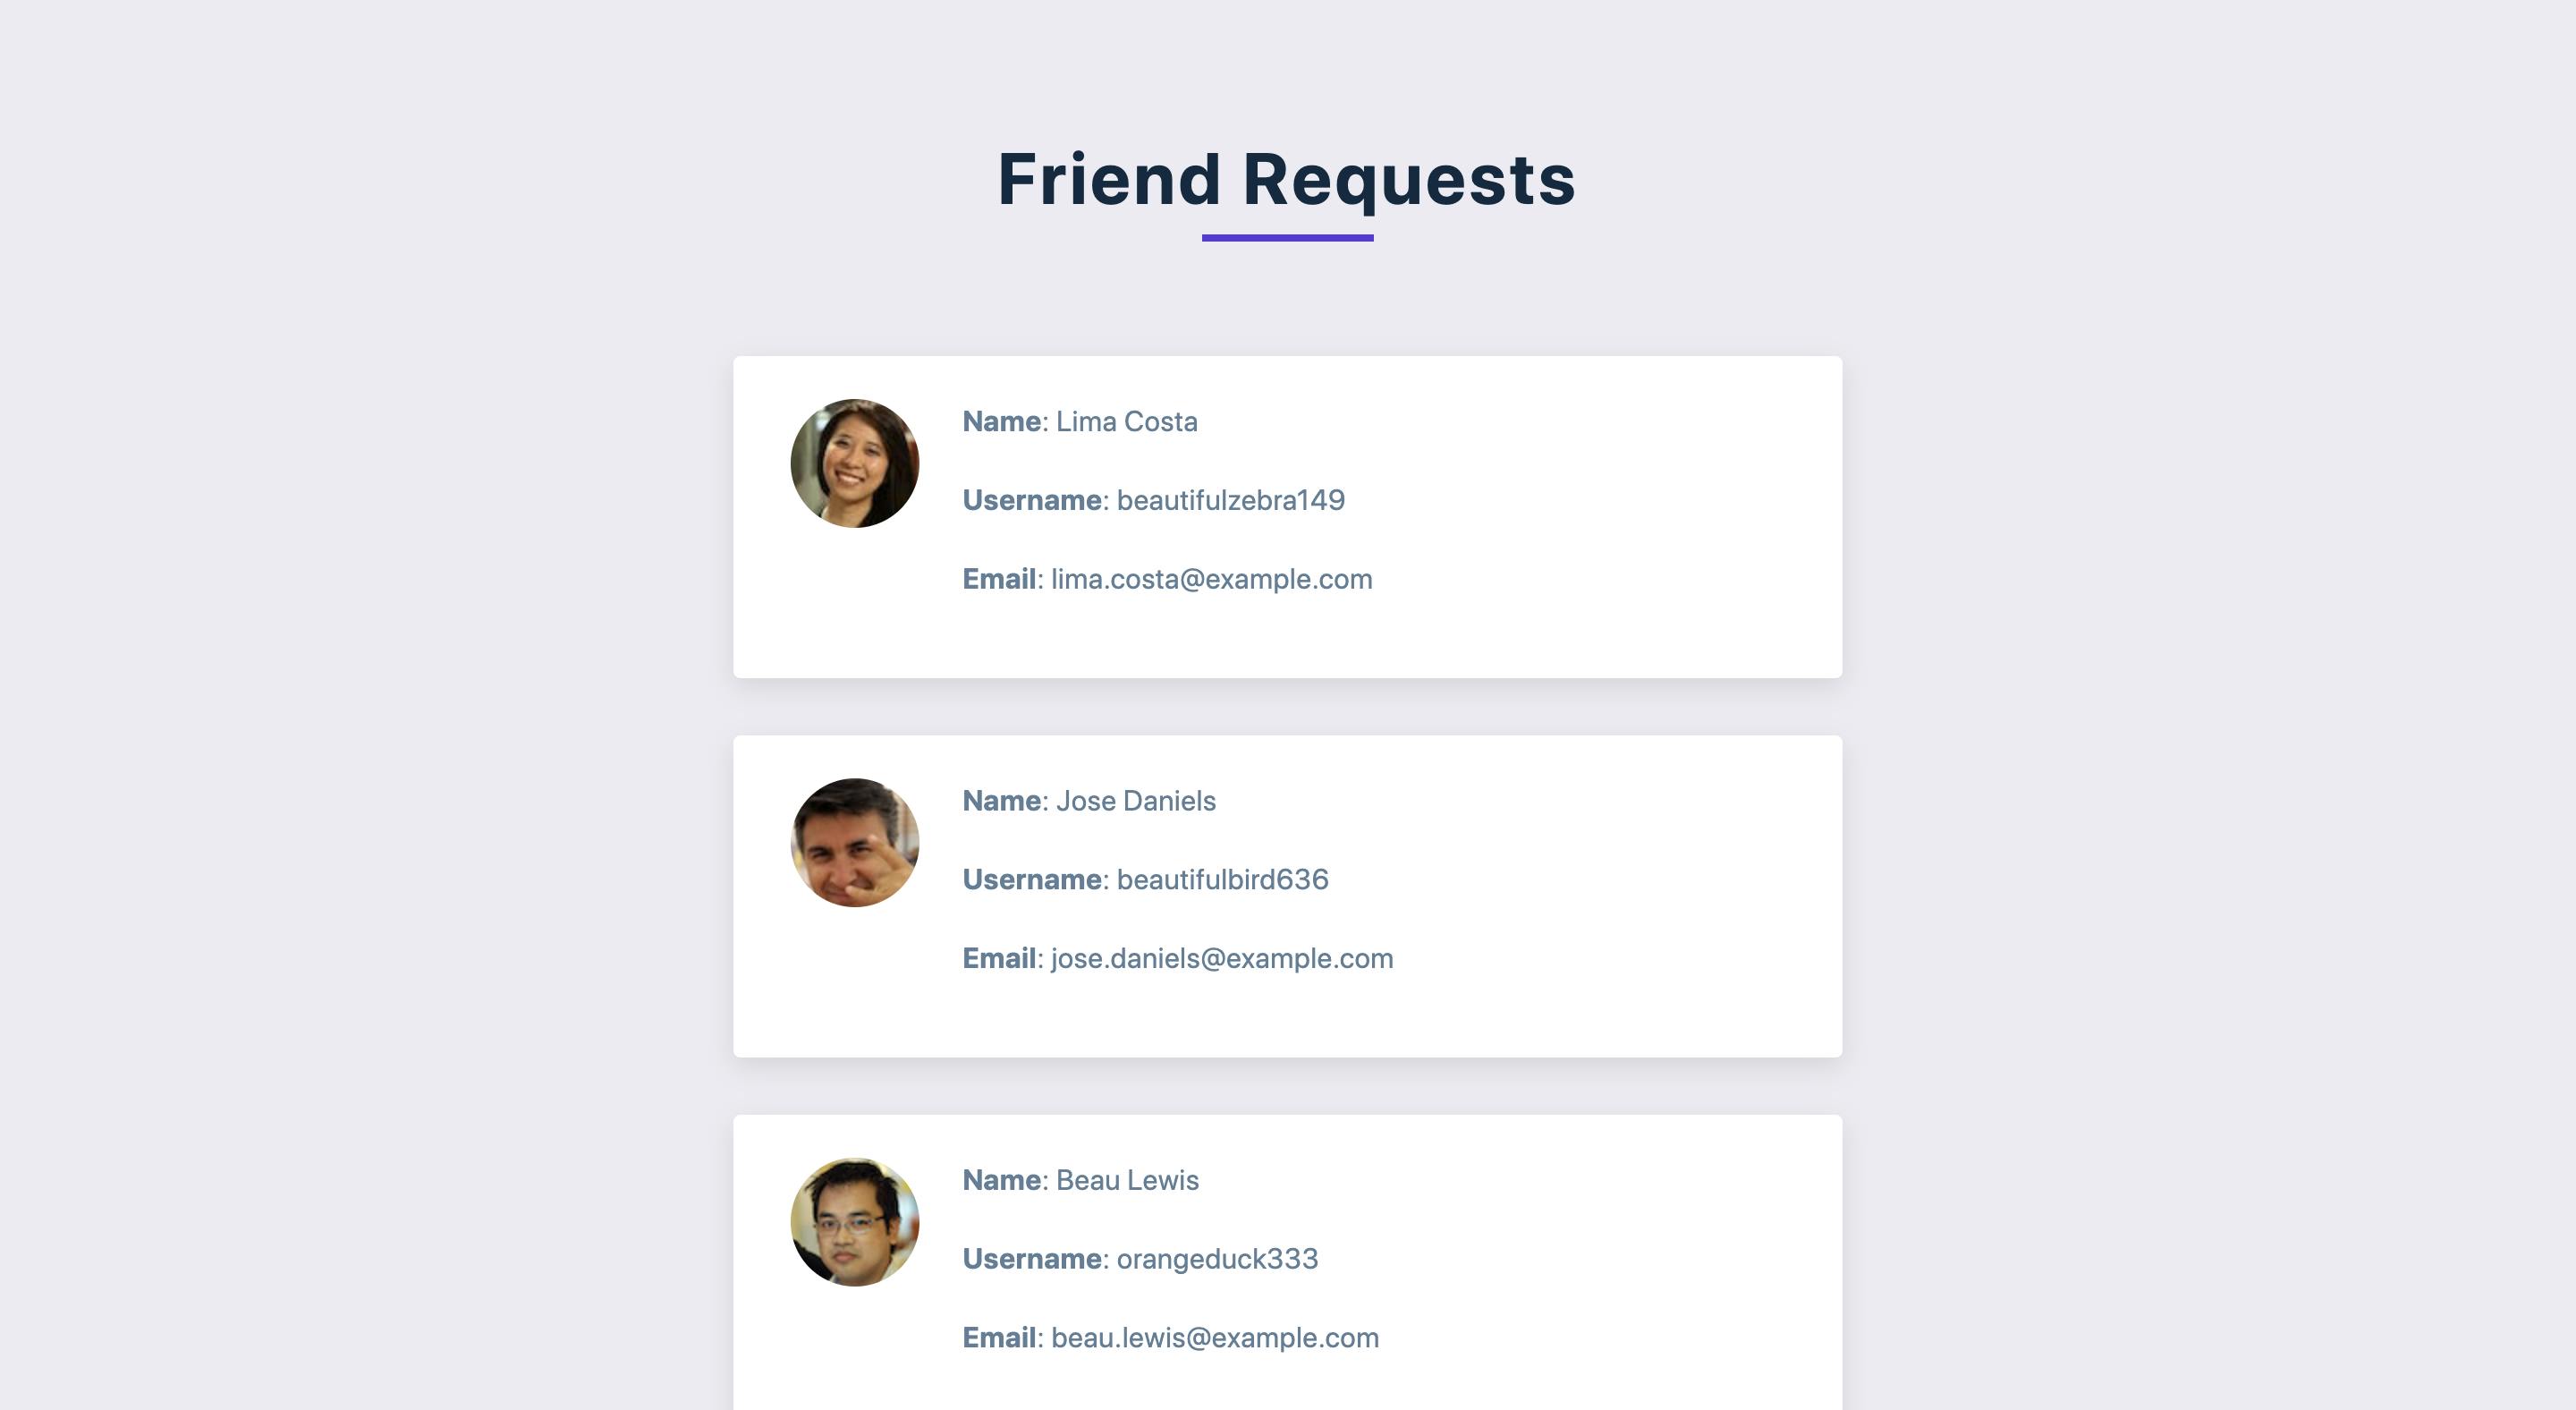
Let's add a new test within our describe block to assert that the first index of the data is in the DOM.
describe("Requests page", () => {
test("Renders Requests component", async () => {
render(<Requests />);
await Promise.all([
waitForElementToBeRemoved(() => screen.queryByText(/Loading.../i)),
]);
expect(axios.get).toHaveBeenCalledTimes(1);
});
// new test block
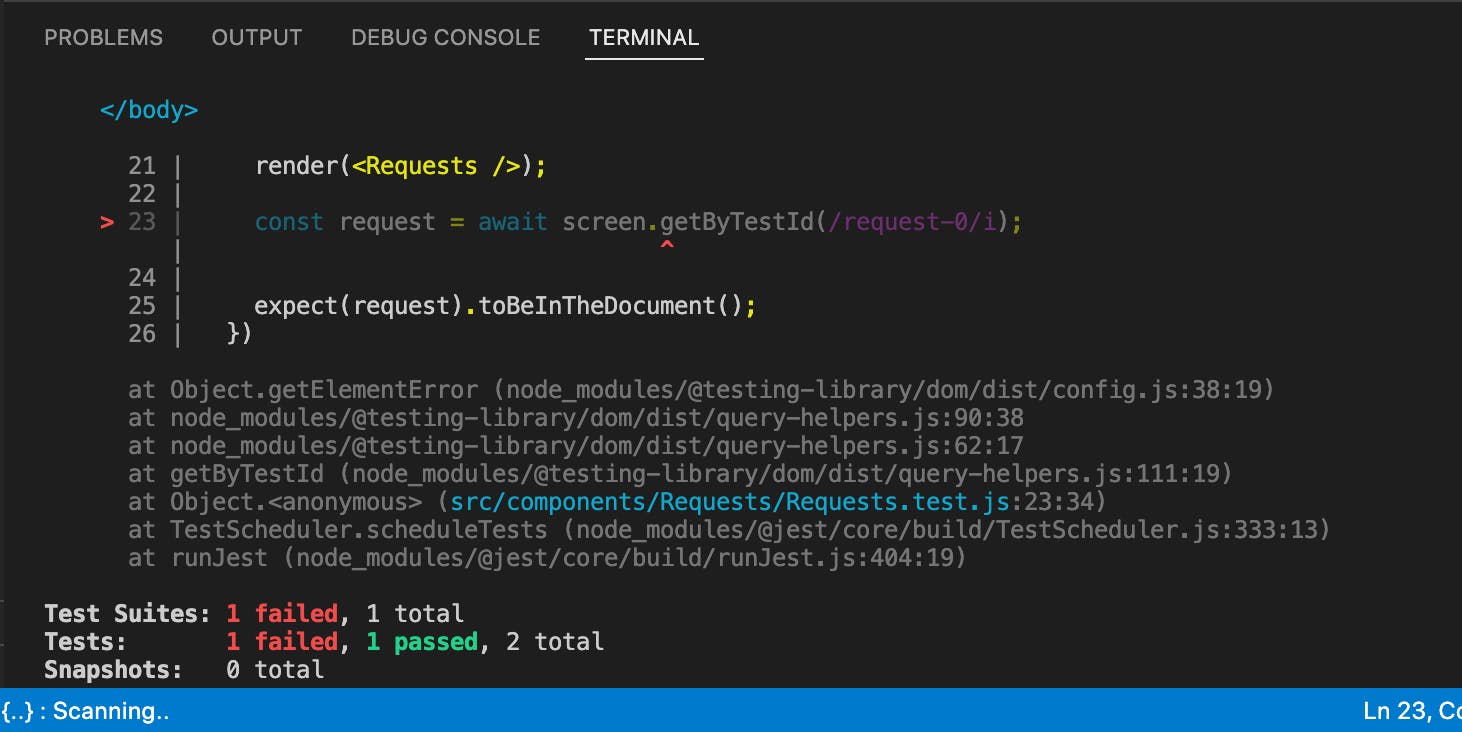
test("finds first index of Request in the DOM", async () => {
render(<Requests />);
const firstRequest = await screen.findByTestId(/request-0/i);
expect(firstRequest).toBeInTheDocument();
})
});
Notice that the test block received an async function? this is required so that we can use await within the function.
<Requests /> component is rendered, next, we find the firstRequest element by its test-id. Our test will fail because no element has request-0 as a test-id.
What is a test-id?
Test-id is a unique attribute you can give to an element. For example:
<div data-testId="unique-attribute">Hello World</div>
Head on to src/components/Request/Request.js and give the parent div a unique test-id.
//   src/components/Request/Request.js

<div className="single-request" data-testid={`request-${index}`}>
It's worth noting that we specifically used findByTestId and this is because, unlike getBy... and queryBy..., findBy... returns a Promise which resolves when an element is found that matches the given query.
Which means if we had used getByTestId or queryByTestId, our test would have failed:
But since we didn't, the test passed!
Decline Button
Next, we add a button that, when clicked, declines a friend request and removes it from the screen. Create a new test file src/components/Request/Request.test.js and paste the code below:
// src/components/Request/Request.test.js

import { render, screen, fireEvent } from "@testing-library/react";
import Request from "./Request";
import { singleMockData } from "../../mockData";

const mockedFn = jest.fn();

describe("Single Request component", () => {
  test("decline button to unmount component", () => {
    const { unmount } = render(
      <Request
        index={0}
        key={0}
        {...singleMockData}
        removefriendRequest={mockedFn}
      />
    );

    const declineButton = screen.getByText(/decline/i);
    fireEvent.click(declineButton);
    unmount();

  });
});
We start by rendering the component, but because we'll need the unmount function later, we destructure it from the render method. <Request /> takes in a bunch of props, so we provide it with the necessary props; for the removefriendRequest prop, we pass in a mock function that returns undefined.
Finally, we locate the button element in the DOM using getByText and fire a click event using the fireEvent method. After the click event is fired, we unmount <Request /> using unmount().
Next, let's update <Requests /> by adding the removefriendRequest function and passing it as a prop into <Request />. Look out for the comments in the code block below:
// src/components/Requests/Requests.js

import React, { useState, useEffect } from "react";
import Request from "../Request/Request";
import axios from "axios";

const Requests = () => {
  const [loading, setLoading] = useState(true);
  const [friendRequests, setFriendRequests] = useState([]);

  useEffect(() => {
    fetchFriendRequests();
  }, []);

  const fetchFriendRequests = async () => {
    try {
      const { data } = await axios.get("https://randomuser.me/api/?results=5");
      setFriendRequests(data.results);
      setLoading(false);
    } catch (error) {
      console.log(error);
    }
  };
    //  Remove Friend Request Function
    const removefriendRequest = (id) => {
    const newfriendRequests = friendRequests.filter(
      (friendRequest) => friendRequest.id !== id
    );
    setFriendRequests(newfriendRequests);
  };

  if (loading) {
    return (
      <div className="loading">
        <h1>loading...</h1>
      </div>
    );
  }

  return (
    <section>
      <div className="title">
        <h2>friend requests</h2>
        <div className="underline"></div>
      </div>
      <div>
        {friendRequests.map((request, index) => {
          const { login } = request;
          return (
            <Request
              index={index}
              key={login.uuid}
              {...request}
              removefriendRequest={removefriendRequest}   /*{Add as prop}*/
            />
          );
        })}
      </div>
    </section>
  );
};

export default Requests;
Next, let's update <Request /> by adding removefriendRequest as a prop and the decline button. Look out for the comments in the code block below:
import React from "react";

// Add removefriendRequest as prop
const Request = ({ name, email, login, picture, index, id, removefriendRequest }) => {
  return (
    <div className="single-request" data-testid={`request-${index}`}>
      <div className="single-request-main">
        <div>
          <img src={picture.medium} alt={name.first} />
        </div>
        <div>
          <p>
            <strong>Name</strong>: {name.first + " " + name.last}{" "}
          </p>
          <p>
            <strong>Username</strong>: {login.username}{" "}
          </p>
          <p>
            <strong>Email</strong>: {email}{" "}
          </p>
        </div>
      </div>
       {/* Decline Button */}
      <div>
        <button className="delete-btn" onClick={() => removefriendRequest(id)}>
          decline
        </button>
      </div>

    </div>
  );
};

export default Request;
All tests passed!
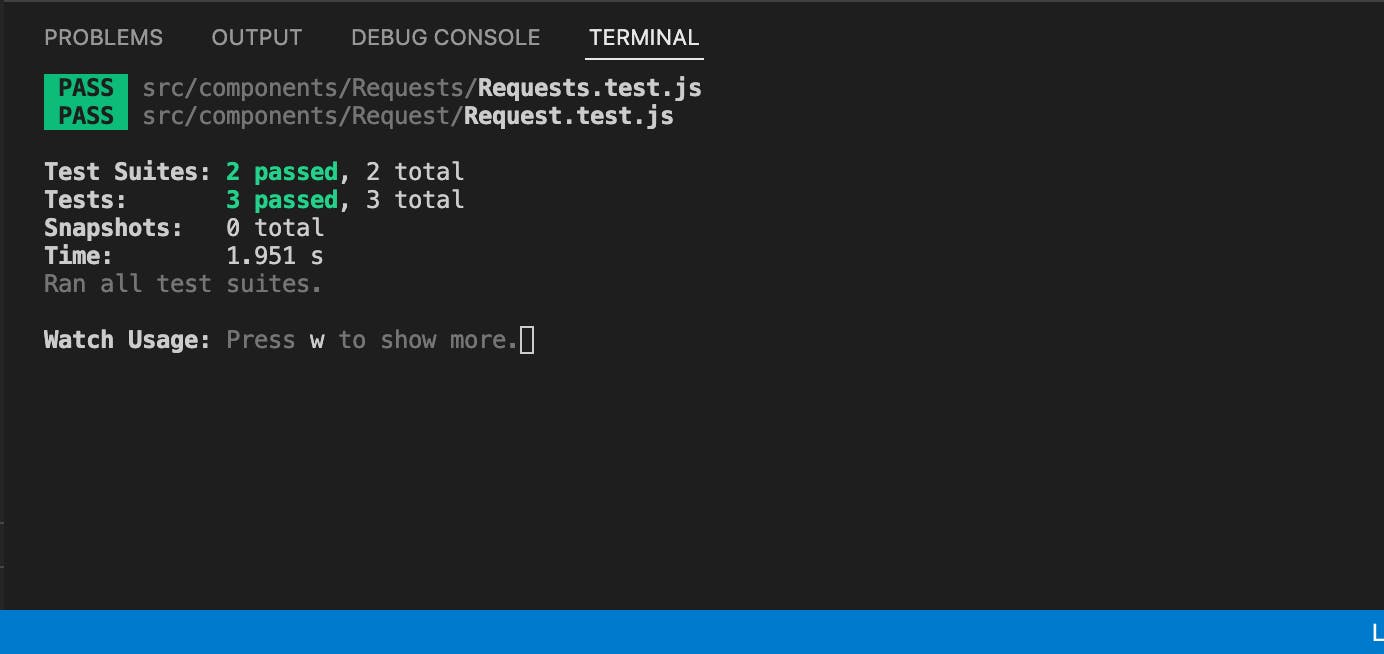
The application is looking good and the decline button works as expected.
Refresh Button
Finally, we add a refresh button that loads new friend requests when the user has declined all friend requests. Head on to src/components/Requests/Requests.test.js and add the new test block below to the describe block:
test("Refresh Button loads new friend requests", async () => {
    // declare empty value
    const value = {
      data: {
        results: [],
      },
    };

    // mock axios.get to return an empty array
    axios.get.mockResolvedValueOnce(value);

    render(<Requests />);
    await Promise.all([
      waitForElementToBeRemoved(() => screen.queryByText(/Loading.../i)),
    ]);

    const refreshButton = screen.getByText(/refresh/i);

    fireEvent.click(refreshButton);

    expect(screen.getByText(/friend requests/i)).toBeInTheDocument();
  });
When there are no more friend requests, that means the state friendRequests in the component <Requests /> is an empty array; so the first thing we do in the test block above is mock axios.get to return an empty array. Next we render our component and wait for Loading... to be removed from the DOM.
Finally, the refreshButton is queried from the DOM, a click event is fired and then we expect the text friend requests to be in the DOM.
Right now our test is failing, so let's update the <Requests /> component. Look out for the comment below:
import React, { useState, useEffect } from "react";
import Request from "../Request/Request";
import axios from "axios";

const Requests = () => {
  const [loading, setLoading] = useState(true);
  const [friendRequests, setFriendRequests] = useState([]);

  useEffect(() => {
    fetchFriendRequests();
  }, []);

  const fetchFriendRequests = async () => {
    try {
      const { data } = await axios.get("https://randomuser.me/api/?results=5");
      setFriendRequests(data.results);
      setLoading(false);
    } catch (error) {
      console.log(error);
    }
  };

  const removefriendRequest = (id) => {
    const newfriendRequests = friendRequests.filter(
      (friendRequest) => friendRequest.id !== id
    );
    setFriendRequests(newfriendRequests);
  };

  if (loading) {
    return (
      <div className="loading">
        <h1>loading...</h1>
      </div>
    );
  }

  // Condition for when friendRequests is an empty array
  if (friendRequests.length === 0) {
    return (
      <main>
        <div className="title">
          <h2>no Requests</h2>
          <button className="btn" onClick={() => fetchFriendRequests()}>
            refresh
          </button>
        </div>
      </main>
    );
  }

  return (
    <section>
      <div className="title">
        <h2>friend requests</h2>
        <div className="underline"></div>
      </div>
      <div>
        {friendRequests.map((request, index) => {
          const { login } = request;
          return (
            <Request
              index={index}
              key={login.uuid}
              {...request}
              removefriendRequest={removefriendRequest}
            />
          );
        })}
      </div>
    </section>
  );
};

export default Requests;
Now that we've updated the component, it's expected that the test will pass, but it didn't. We have a “not wrapped in act” error.
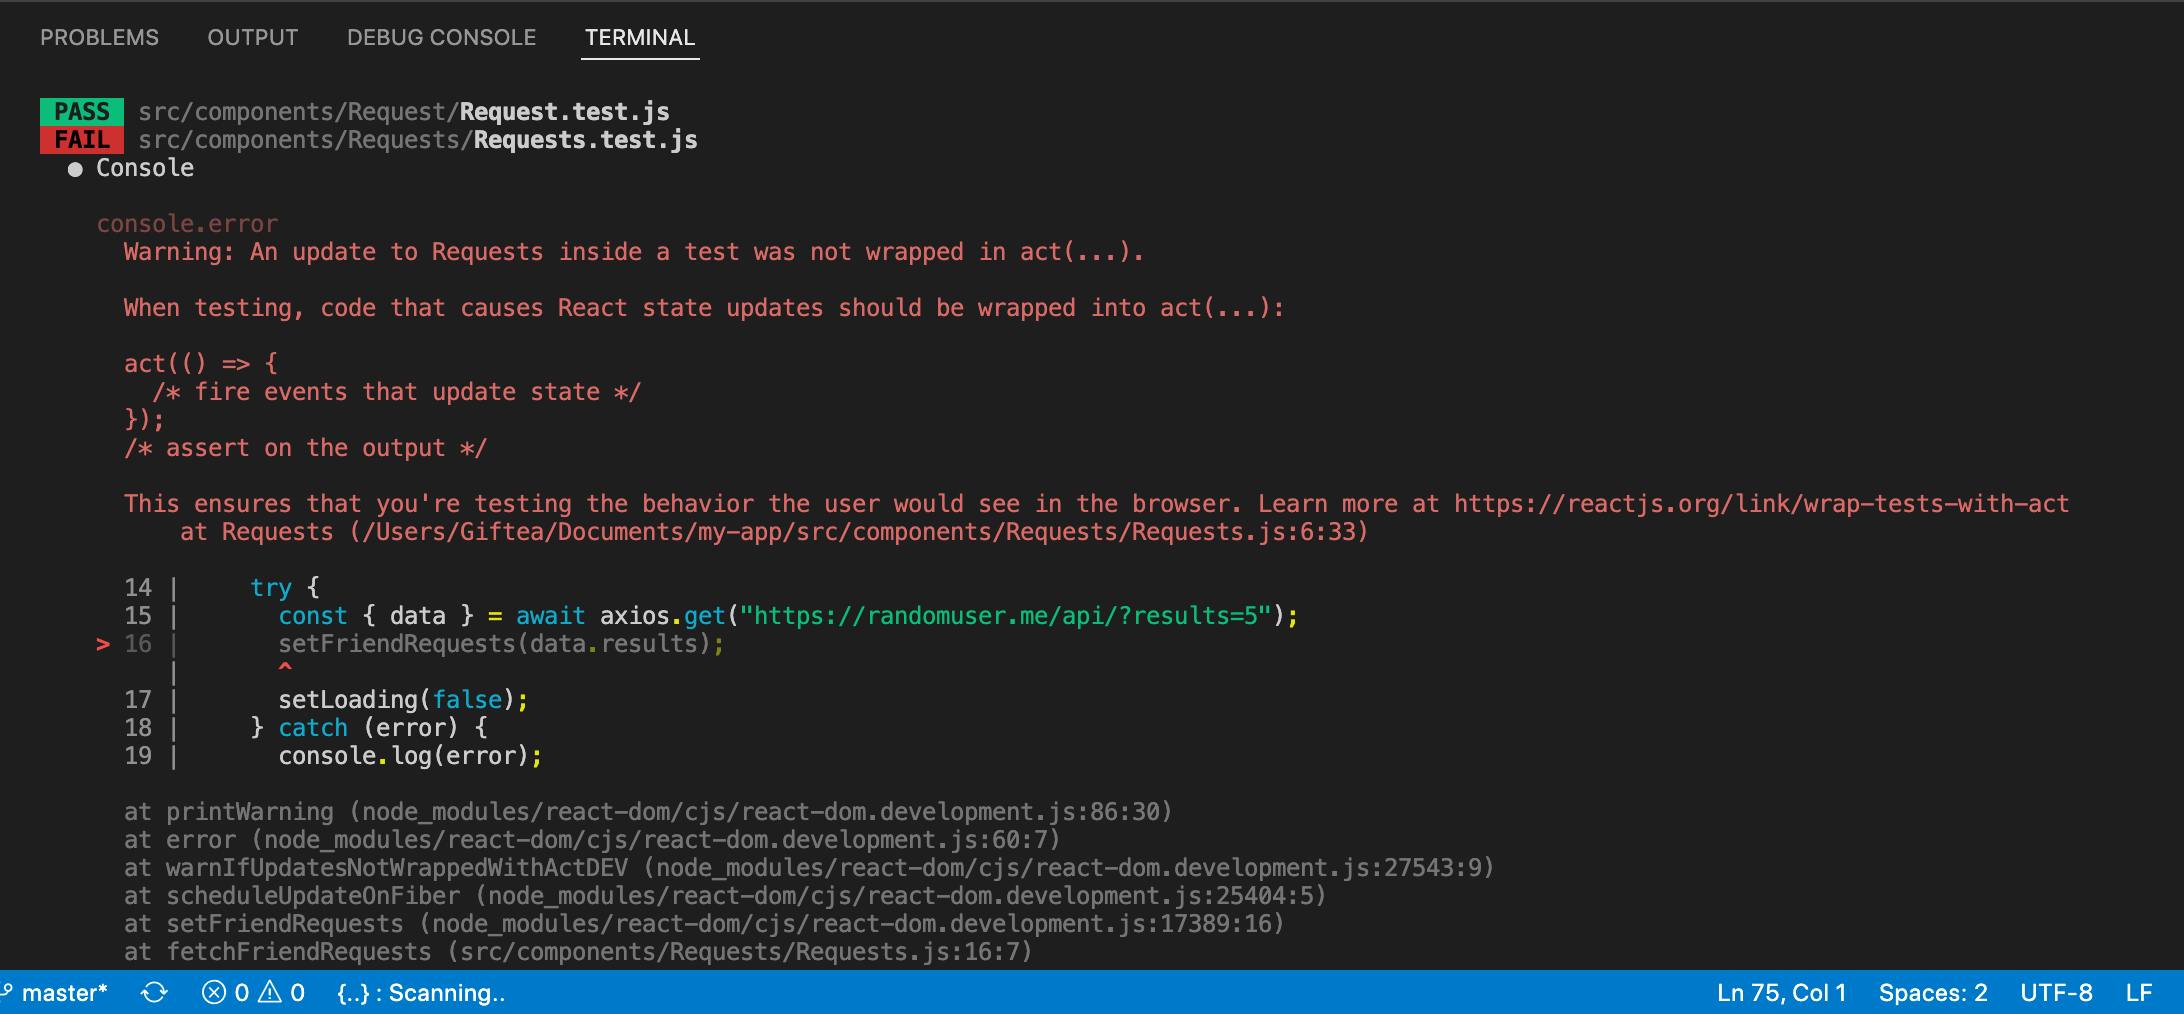
We encountered this error because fireEvent.click(refreshButton) triggered an asynchronous call. You may encounter this error for a bunch of other reasons as you write tests; As a result, I recommend that you bookmark Kent Dodds' post for more information on this act warning.
To resolve our current error, use waitFor to wait for the component update to finish completely. waitFor is a React testing library API that allows you to wait for wrapped assertions to pass within a specific timeout window.
Let's head on and update src/components/Requests/Requests.test.js.
Import waitFor from @testing-library/react:
// src/components/Requests/Requests.test.js

import {
  render,
  screen,
  fireEvent,
  waitFor, // import waitFor
  waitForElementToBeRemoved,
} from "@testing-library/react";
Update the refresh button test with the code block below:
  // Refresh button Test
  test("Refresh Button loads new friend requests", async () => {
    const value = {
      data: {
        results: [],
      },
    };
    axios.get.mockResolvedValueOnce(value);

    render(<Requests />);
    await Promise.all([
      waitForElementToBeRemoved(() => screen.queryByText(/Loading.../i)),
    ]);

    const refreshButton = screen.getByText(/refresh/i);

    fireEvent.click(refreshButton);

    // Wrap assertion within waitFor
    await waitFor(() => {
      expect(screen.getByText(/friend requests/i)).toBeInTheDocument();
    });
  });
You can perform a manual test by checking how the project runs on the browser. If you have any errors, you can check out the code on this repo.
Also, make sure in your package.json file you have this configured:
  "jest": {
    "resetMocks": false
  },
Conclusion
The importance of app testing, especially for large apps, cannot be overstated. Writing automated tests is essential for developing high-quality applications. It's simple to start testing react apps and increasing code quality with CRA's testing docs, React Testing Library, and Jest.
Hopefully, this article was helpful and will assist you in the future in developing reliable React apps. The finished project is available on Github.
Thanks for reading!